Identify and Fix Common Grout Problems
Home Care, Grout Problems, Tile Maintenance
Common Grout Problems Customers Can Identify Themselves (And How to Fix Them Correctly)
You walk into your bathroom or kitchen and something looks “off.” The tile is still beautiful, but the grout lines are dull, blotchy, cracked, or stained. The good news: many Grout Problems are easy to recognize long before they become serious damage. The better news: with the right mix of smart DIY grout maintenance and professional help from TripleILLc, you can restore and protect your grout so it looks clean and stays strong for years.
Why Grout Problems Matter More Than You Think
Grout does more than fill the gaps between tiles. It helps lock tiles in place, keeps water from getting behind your surfaces, and gives floors, showers, and backsplashes a finished look. When grout fails, you can end up with:
Loose or cracked tiles that are expensive to replace
Hidden water damage, mold, and mildew behind walls or under floors
Permanent staining that makes even new tile look old and neglected
Understanding the most common grout issues—what they look like, what causes them, and how to address them—helps you decide when a simple DIY grout maintenance session is enough and when it is time for TripleILLc to step in with professional restoration and sealing.
1. Efflorescence and Hazy Residue: The White Film That Keeps Coming Back
One of the most confusing grout problems for homeowners is a white, chalky film or haze that appears on grout or tile. Sometimes it shows up right after installation; other times it appears months later. This is known as efflorescence, and it is a key target for Efflorescence Solutions from professionals like TripleILLc.
What Efflorescence Looks Like
A powdery, white buildup on grout lines or tile surfaces
A cloudy haze that dulls the color and shine of your tile
Residue that returns even after you wipe it away
What Causes Efflorescence and Haze?
Efflorescence is directly related to water movement and mineral salts. When water travels through cement-based grout or the mortar bed beneath your tile, it dissolves salts inside the material. As that moisture evaporates at the surface, the salts are left behind as a white film. Common triggers include:
Excess moisture under tile from leaks, unsealed grout, or poor drainage
Using too much water during grout cleanup after installation
Hard water and mineral-heavy tap water used for mopping or cleaning
Chemical residue also plays a role. Harsh cleaners can react with grout and tile, leaving behind a persistent haze that looks similar to efflorescence but behaves differently. An expert diagnosis from TripleILLc can distinguish between mineral buildup and chemical film so the right Efflorescence Solutions are used.
DIY vs. Professional: How to Handle Efflorescence Safely
For light, surface-level haze, gentle DIY cleaning can be effective:
Start with a dry, soft-bristle brush to remove loose powder from grout lines.
Follow with a neutral-pH tile and grout cleaner and a microfiber cloth, avoiding overly wet mopping.
⚠️ Warning: Do not jump straight to strong acids or vinegar. The wrong cleaner can etch tile, weaken grout, and lock in discoloration.
Efflorescence becomes risky for DIY when:
The white buildup returns quickly after cleaning (a sign of ongoing water intrusion).
Haze covers a large area, including vertical surfaces like shower walls.
Tiles feel damp or hollow, suggesting deeper structural moisture issues.
In these cases, TripleILLc can identify the moisture source, apply the correct Efflorescence Solutions, and then seal the grout to reduce future water penetration and mineral migration.
2. Cracking or Crumbling Grout: When Lines Start to Break Apart
Few things are more alarming than seeing gaps, cracks, or loose chunks in your grout lines. Cracked Grout Repair is one of the most requested services because it affects both appearance and safety. Left alone, cracked or crumbling grout creates pathways for water and dirt that can quickly escalate into serious damage.
What Cracked or Crumbling Grout Looks Like
Hairline cracks running along or across grout lines
Small pieces of grout flaking off or missing sections altogether
Grout that feels sandy, soft, or hollow when pressed
What Causes Cracking and Crumbling Grout?
Several factors can cause grout to fail, often working together over time:
Aging and wear: Older grout can simply dry out, lose flexibility, and become brittle, especially in high-traffic areas.
Movement in the substrate: Houses settle, wood subfloors flex, and temperature changes cause expansion and contraction. Grout is rigid, so movement underneath can lead to cracking.
Improper installation: Grout mixed with too much water, not packed deeply enough, or allowed to dry too quickly will be weak from the start.
Harsh chemical cleaners: Over time, strong alkaline or acidic products can erode grout, making it soft and crumbly.
When Is Cracked Grout Repair a DIY Job?
Minor surface cracking in a small, dry area can sometimes be addressed by a careful homeowner:
Remove loose particles with a grout saw or utility knife, being careful not to chip tile edges.
Apply a matching grout or grout caulk according to manufacturer instructions.
💡 Pro Tip: Always clean and dry the area completely before attempting any DIY grout maintenance, or your repair may not bond properly.
DIY becomes risky when:
Cracks are widespread, especially in showers, around tubs, or on floors exposed to water.
Tiles move when stepped on or tapped, suggesting problems below the surface.
Old, crumbly grout has lost depth, and large areas need to be re-grouted.
In those cases, TripleILLc can remove failing material, perform a proper Cracked Grout Repair, and then seal the new grout to protect it from future moisture and chemical damage. Attempting a large DIY re-grout without the right tools and experience can lead to uneven lines, color mismatch, and even broken tiles.

Professional repair and sealing stop minor cracks from turning into costly tile failures.
3. Dark Spots and Recurring Staining: When Grout Never Looks Truly Clean
Does your grout look clean right after you scrub it, only for dark spots and stains to reappear in the same places? This is one of the most frustrating grout problems for homeowners and a clear sign that dirt, oils, or moisture have penetrated below the surface. A lasting Stained Grout Fix requires understanding what is causing the discoloration.
What Recurring Stains Look Like
Isolated dark patches in high-use or wet areas, such as around toilets, sinks, and shower entrances
Yellow, brown, or almost black staining that returns quickly after cleaning
Musty odors or a slightly damp feel in the stained areas
What Causes Dark Spots and Staining in Grout?
Several factors contribute to recurring stains:
Water and moisture: Unsealed or poorly sealed grout absorbs water like a sponge. In showers and bathrooms, this moisture can carry body oils, soap residue, and dirt deep into the grout’s pores, creating stains from within.
Chemical residue: Many household cleaners leave behind sticky films that actually attract more dirt. Over time, this residue darkens and makes grout appear permanently dirty.
Mildew and mold growth: In constantly damp areas with limited ventilation, microbial growth can occur inside the grout, leading to stubborn black or greenish spots.
DIY Cleaning vs. Professional Stained Grout Fix
Light surface staining can sometimes be improved with careful DIY grout maintenance:
Use a neutral-pH, non-bleach cleaner designed specifically for tile and grout.
Gently scrub with a soft brush, then rinse thoroughly and dry the area well.
However, recurring stains that return within days or weeks usually mean the discoloration is deeper than surface level. Bleach and harsh chemicals might lighten the stain temporarily but can:
Weaken grout over time, making it more porous and prone to future staining
Fail to address moisture trapped behind the tile, where mold can continue to grow
⚠️ When to Call TripleILLc: If you see dark spots in the same locations over and over, or if stains are accompanied by musty smells or soft grout, it is time for professional evaluation and a true Stained Grout Fix.
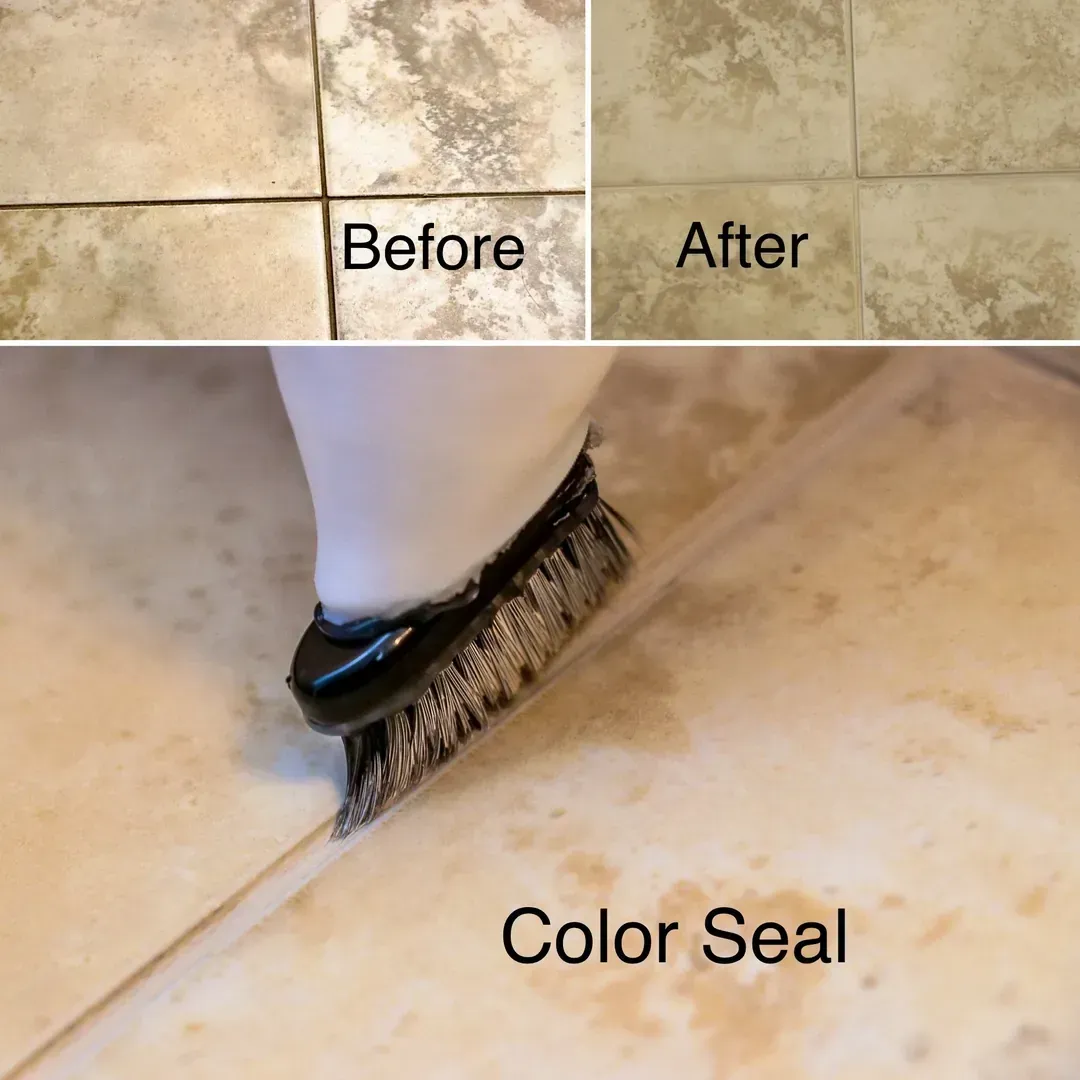
TripleILLc uses specialized cleaners and extraction equipment to pull deeply embedded soils and contaminants out of the grout. Once clean, the grout can be color-sealed or clear-sealed to lock out future staining and make routine cleaning far easier.
4. Uneven Grout Color and the “Patchy” Look
Another common complaint is Uneven Grout Color—some lines look lighter, others darker, or certain areas appear blotchy and inconsistent. Even if the grout is structurally sound, this “patchy” look makes the entire installation seem older, dirtier, and less professional than it really is.
How to Recognize a Patchy Grout Problem
Some grout joints look bright and clean, while others look dingy or gray.
Color varies from room to room, or even within the same small area of floor or wall.
After cleaning, certain sections still look slightly stained or washed-out compared to others.
What Causes Uneven Grout Color?
Uneven Grout Color and patchiness usually come from a combination of installation issues, water exposure, and cleaning habits:
Inconsistent mixing: If grout is mixed in multiple batches with slightly different water ratios, color can vary from one section to the next right from day one.
Uneven drying: Areas that dry faster (from airflow or sunlight) may cure differently than shaded or enclosed areas, affecting final color.
Water and spills: Frequent spills, puddles, or standing water can leach pigment from certain sections of grout, making them lighter or washed out over time.
Improper cleaning: Using different cleaning products in different rooms, or concentrating scrubbing in only the “dirtiest” spots, can lead to patchy results.
Can You Fix Patchy Grout Color Yourself?
Light color differences caused by surface dirt may improve with consistent, gentle cleaning across the entire area. But deeper color inconsistencies—especially those present since installation—are difficult to correct with DIY methods alone. Trying to “spot-fix” color by scrubbing certain joints harder or using stronger chemicals in only some areas often makes the patchiness worse.
TripleILLc offers professional solutions such as:
Deep, even cleaning of all grout lines to remove embedded soils and residues.
Grout color sealing to create a uniform, attractive color across the entire surface, while also adding a protective barrier against water and stains.
Once the color is evened out and sealed, routine DIY grout maintenance becomes much easier—and your tile instantly looks newer and more high-end.
The Role of Water, Chemicals, Aging, and Cleaning Habits in Grout Problems
Across all of these grout problems—efflorescence, cracking, staining, and uneven color—the same culprits show up again and again: water, chemical residue, aging, and improper cleaning. Understanding how each one affects your grout helps you protect your investment.
Water: Necessary for mixing and curing grout, but damaging in excess. Persistent moisture leads to efflorescence, mold, staining, and weakened grout joints. Proper sealing and good ventilation are essential defenses.
Chemical residue: Strong cleaners might seem like a quick fix, but they often leave films that attract more dirt or slowly erode grout. Stick with neutral-pH products unless a professional recommends something more specialized for a specific issue.
Aging: Over time, grout naturally loses some of its original strength and color. Regular sealing, gentle cleaning, and timely repairs extend its life and delay costly reinstallation.
Improper cleaning: Over-wetting floors, using the wrong tools, or scrubbing only select spots all contribute to patchiness, staining, and surface damage.
Smart DIY Grout Maintenance: What You Can Safely Do Yourself
Not every grout issue demands professional service. There is plenty you can do at home to keep problems from starting—or to manage minor concerns before they grow. Safe DIY grout maintenance includes:
Wiping down shower walls and floors with a squeegee after use to reduce standing water and soap residue.
Mopping tile floors with a neutral-pH cleaner and minimal water, then drying with a clean towel.
Addressing small, isolated cracks or chips with matching grout or caulk, after cleaning and drying the area thoroughly.
The key is to recognize when DIY reaches its limit. If you are dealing with recurring efflorescence, widespread cracking, stubborn dark staining, or uneven color that will not respond to basic cleaning, it is time to bring in TripleILLc for expert-level diagnosis, restoration, and sealing.
When TripleILLc Should Restore and Seal Your Grout
Professional help is not just about saving you time and effort—it is about protecting your home from hidden damage. TripleILLc should be your first call when:
Efflorescence or haze keeps returning despite your cleaning efforts, suggesting ongoing moisture migration.
Cracking or crumbling grout is widespread, especially in wet areas like showers and around tubs.
Dark spots and staining reappear quickly, or are associated with musty odors or soft grout joints.
Your grout has an uneven, patchy look that basic cleaning cannot correct, and you want a consistent, refreshed appearance.
TripleILLc’s process typically includes:
Expert assessment to identify the true causes behind your grout problems, including moisture testing where appropriate.
Professional cleaning, Cracked Grout Repair, and, when necessary, re-grouting to restore structural integrity.
Application of high-quality sealers or color sealers to lock in appearance, resist water and stains, and make future DIY grout maintenance much easier.
Ready for Clean, Healthy, and Beautiful Grout? Call TripleILLc
You do not have to live with dull, stained, cracked, or patchy grout—and you do not have to guess your way through risky repairs. Now that you know how to identify common grout problems yourself, you are in a perfect position to decide what you can handle and when expert help is the smarter investment.
Whether you are dealing with stubborn efflorescence that will not stay away, in need of reliable Efflorescence Solutions, facing serious Cracked Grout Repair, searching for a long-term Stained Grout Fix, or frustrated by Uneven Grout Color and a patchy look, TripleILLc can restore your tile surfaces and protect them with professional sealing.
Take the next step today: schedule a grout inspection and restoration consultation with TripleILLc. We will evaluate your tile and grout, explain your options in clear language, and create a plan that combines expert repair with practical tips for ongoing DIY grout maintenance. Your floors, showers, and backsplashes can look fresh, clean, and beautiful again—and stay that way.